sbackup stands for simple backup.
sbackup is a backup utility for GNOME desktop. The user interface is simple, intuitive and has several advanced features to satisfy most of your typical Linux desktop backup needs.
If you need a very simple and straight forward backup GUI tool for Ubuntu, check out pybackpack that we discussed earlier.
1. Install sbackup
First, install sbackup software on your Ubuntu Desktop using apt-get install as shown below.
$ sudo apt-cache search sbackup
sbackup - Simple Backup Suite for desktop use (core functionality)
sbackup-gtk - Simple Backup Suite GTK+ graphical user interface
sbackup-plugins-fuse - Simple Backup Suite FUSE plugins

$ sudo apt-get install sbackup
To launch the tool, click on “Applications” -> System Tools -> Simple Backup-Configuration

This will prompt you to “Enter your password to perform administrative tasks” before launching the GUI.
2. Backup Profiles
A profile is a combination of several file and folders that needs to be included or excluded from the backup, along with other sbackup options.
By default sbackup comes with a profiles called “Default profile”, you can edit this profile and changes the values accordingly. But you cannot delete this profile.

If you want to create your own profile, do the following:
Go to “Tools” -> Profile Manager -> Click on “Add” -> Give a name to your profile. In the following example, I created a profile called “My Dropbox”.
Anytime you start sbackup, it starts with the “Default profile”, to change to your custom profile, go to “Tools” -> Profile Manager -> select your profile -> and click “Edit”. Verify the start bar at the bottom to make sure your selected profile is used.

Note: To keep things simple, just use the “Default profile” and modify the backup options accordingly, and save it to the “Default profile”.
3. General Tab
From here you can do the following:
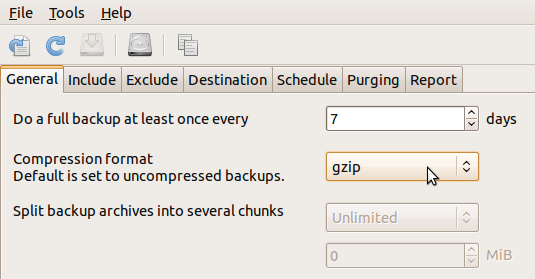
- Set how often you need to do a full backup. By default it takes full backup every 7 days.
- Choose the compression format of the backup files. Default is none. Change this to either gzip or bzip2.

4. Include Tab
From here you can add the list of files or directories that you like to include in your backup. In this example, I selected “Add Directory” and added “/home/ramesh/Dropbox”.

5. Exclude Tab
From here you can add the list of files or directories that you like to exclude from your backup. Following are the 4 subtabs available under Exclude main tab.
- Paths: From here you can specifically add files or directories that needs to be excluded from the backup.
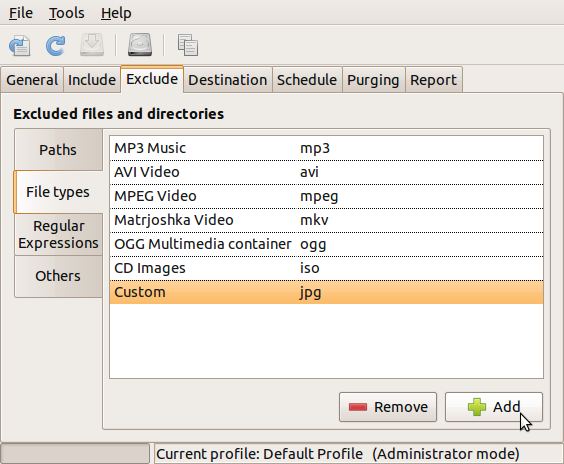
- File types: From here you can specify the types of files that needs to be excluded from the backup. By default this list already has mp3, avi, mpeg, mkv, ogg, iso files that will not be backed-up. I clicked on ‘Add’ button and added the jpg to this list. You can add as many custom extension as you want that needs to be excluded from the backup.
- Regular expressions: You can also exclude files base don regular expression. By default .gvfs, .thumnails .trash, .cache folders located under your home directory are not included in your backup. You can add your own custom regular expression to this list.
- Others: From here you can specify to exclude files that are bigger than a specific size.

6. Destination Tab
From here you can specify the destination location where the backup needs to be stored. You can choose to store your backup either on your local machine, or on a remote server using ssh.

7. Schedule Tab
If you prefer, you can schedule to run your backup job at a specific time. The drop-down list under “Simple” radio button give you the option to schedule the backup job hourly, daily, weekly and monthly.
If you are comfortable with crontab format, select the “Custom” radio button, and specify the cron entry here.

If you select daily, it will create the following link under the /etc/cron.daily directory.
# ls -l /etc/cron.daily/sbackup
lrwxrwxrwx 1 root root 33 2011-10-08 15:54 /etc/cron.daily/sbackup -> /usr/share/sbackup/sbackup-launch
8. Purging Tab
You can purge your old backups on an on-going basis by selecting one of the two options:
Simple cut-off erases backups that are older than a specified number of days. For example, delete all backups that are older than 30 days.
Logarithmic, which will keep progressively less backups into the past.

9. Report Tab
sbackup creates a report file everytime it execute the backup. Leave the log level at the default “info” level, which tracks enough log information to view what was backedup.
If you want the report to be automatically mailed to you anytime the backup job runs from the background, you need to specify your mail server information as shown below.

10. Save Options and Take backup
Once you’ve set all your required options to the default profile, click on “File” menu -> “Save”, which will save all your configurations.
If you like to take your 1st full backup immediately, click on “Tools” -> Make backup now.
The sbackup tool bar contains the following 5 buttons (from left to right):
![]()
- Set default settings – Clicking on this will restore the default values for the current profile that is getting edited. It will ask for a confirmation before resetting it. Please note that this will undo all your configurations and reset it to the system default settings.
- Reload configuration – If you’ve made some setting changes, and would like to undo it, click on this button, which will reload the last saved configuration information.
- Save configuration – If you’ve made any setting changes, this button will be enabled. Click on this to save the setting changes to your profile.
- Make a backup now – This will start the backup of the currently selected profile immediately.
- Open the profile manager – This will display the profile manager window, from where you can add, edit, or delete backup profiles.
Once the backup is over, it will also pop-up an automatic notification window saying that the backup is completed, as shown below.

11. Restore Backup
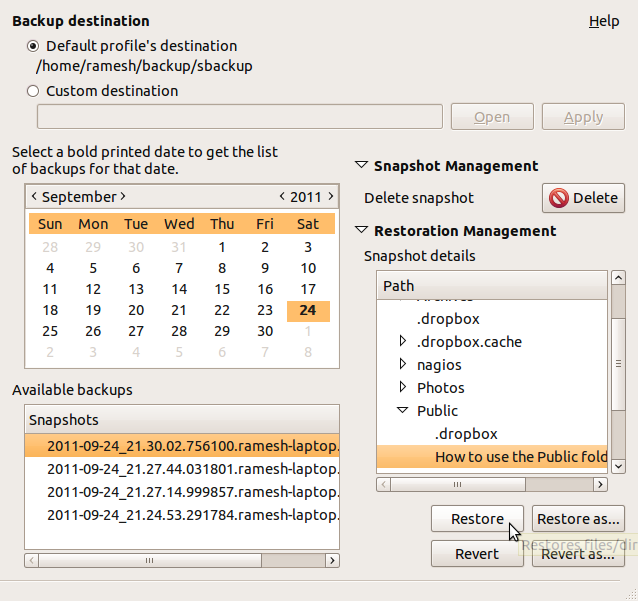
To launch the sbackup Restore UI, from the Ubuntu Menu -> Applications -> System Tools -> Simple Backup-Restoration, which will display the following UI.
Restoring files form sbackup is pretty straight forward and intuitive. By default it will pick the backup destination directory from the “Default profile”. From the calendar, select the data from which you want to restore your backup, which will display all the available full and incremental backup as of that date (these are called snapshots).
Once you select a snapshot from the “Available backups”, you can browse the files and directories in that snapshot, and select the directory or file you want to restore, and click on “Restore”. If you want to restore the file/folder to a different location than the original, select “Restore as”. From here you can also delete any of your old snapshots.


 My name is Ramesh Natarajan. I will be posting instruction guides, how-to, troubleshooting tips and tricks on Linux, database, hardware, security and web. My focus is to write articles that will either teach you or help you resolve a problem. Read more about
Comments on this entry are closed.
now ubuntu 11.10 comes with deja dup backup tool, it has cloud storage capability and compes with ubuntu one integration.
excellent tool,excellent tutorial as usual!thanks ramesh.
Watch out for this tool. I used it a while back, there was an upgrade I didn’t know about which changed the file format. My system crashed and when I went to use my back up sbackup said it had to convert my backup file. All it did is corrupt the backup file and when I went to the development site and asked for help all I got was . I won’t use it again!
Is there any option to encrypt the backup content?
Very valuable article!
This site is a pretty good source of knowledge, btw do you know how to enable cyrillic alphabet in linux distros? I’m running with this issue quite a while, some files here in croation/bulgarian when opened just have some weird chars instead!
thanks in advance,
Raphael