GIT is an efficient open source distributed version control system.
This article explains the following:
- How to install GIT on Windows
- How to create a local GIT repository on Windows
- How to connect to a remote GIT repository (that may be located on a Linux server) and download the files to work locally on your Windows machine
If you are new to GIT, make sure to read this article: Introduction to GIT on Linux.
1. How to Install GIT for Windows
Go to GIT download page -> Under “Binaries” section -> Under “Win” section -> Click on msysgit.
This will take you to the msysgit home page. Click on the download tab -> Click on the install link for “Full installer for official Git for Windows” link on the top of this page.
If you don’t want to go through all the above clicks, here is the direct url to the download page on msysgit page.
Currently the latest version of GIT for Windows is: Git-1.7.8-preview20111206.exe
Click on the downloaded executable to start the install process. Accept all the default options during installation as shown below.
The installation wizard will walk you through the following 10 screens:
1) Welcome Screen
2) Read the license
3) Select Destination folder: By default this will be installed under “C:\Program Files\Git”
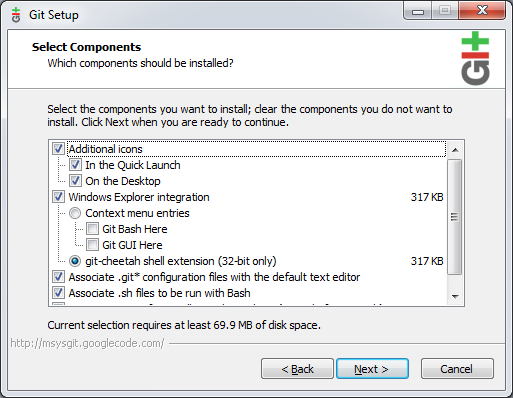
4) Select Components: This lets you choose which components of git you like to install. Use the default selections.
5) Select Start Menu Folder
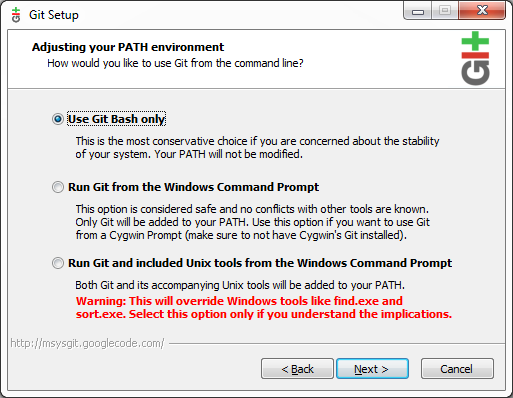
6) Adjusting your PATH environment: Use the default selection “Use Git Bash Only”.
7) Choosing the SSH executable: Use the default selection “Use OpenSSH”.
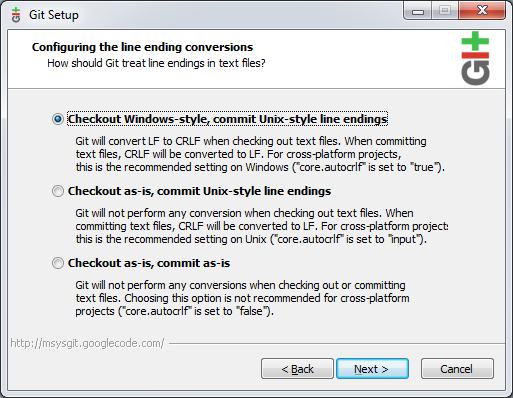
8 ) Configuring the line ending conversions: This indicates how Git will treat the line ending in the text files. If you are planning to checkout files from a remote Git repository that is running on Linux, use the default selection “Checkout Windows-style, commit Unix-style line endings”.
9) Installing This will show the progress bar indicating the installation progress.
10) Completing the Git setup wizard: Click on finish to exist the setup.
2. How to Create a Local GIT repository on Windows
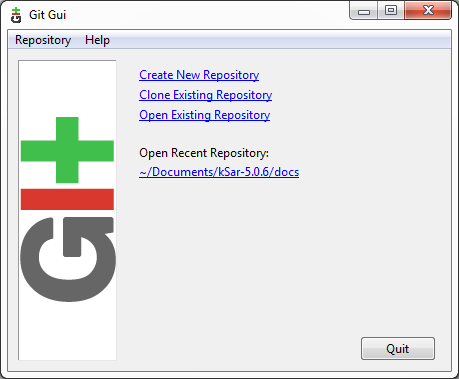
Click on “Git GUI” from the Windows start menu. This will display the following “GIT Menu”. Click on “Create New Repository” from here.
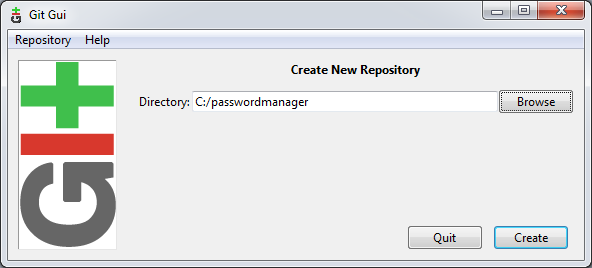
1) Create New Repository:
You will create a new repository only when you have the original source code on your local machine, and you like to track the version locally. If the source code is located in a remote GIT repository, you should use “Clone Existing Repository” option that is explained in the next section.
2) Select the code Directory:
Select the directory where the source code is located. In this example, the source code is located in “c:\passwordmanager”
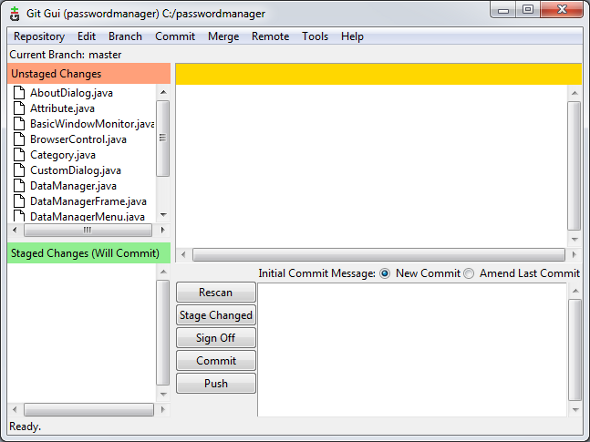
3) Unstaged Changes:
All the files located under “c:\passwordmanager” will be displayed under the “Unstaged Changes” section that is located on the top left corner.
4) Staged Changes
Click on the “Stage Changed” button located at the bottom-middle section. This will stage all these files. Now, you’ll see the “Unstaged Changes” section will become empty, and all the files will be displayed under the “Staged Changes (Will Commit)” section that is located on the bottom left corner.
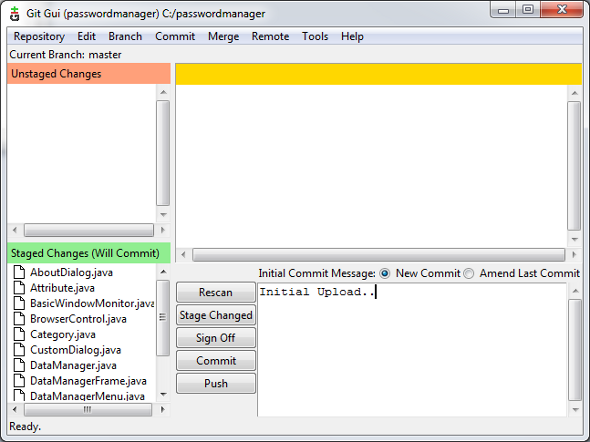
5) Commit Changes
Enter a commit message on the big text box located on the bottom right corner, and click on “Commit” button. This will commit all the files from the “Staged Changes (Will Commit)” section. Once you commit, both the “Unstaged Changes” and “Staged Changes” section will be empty.
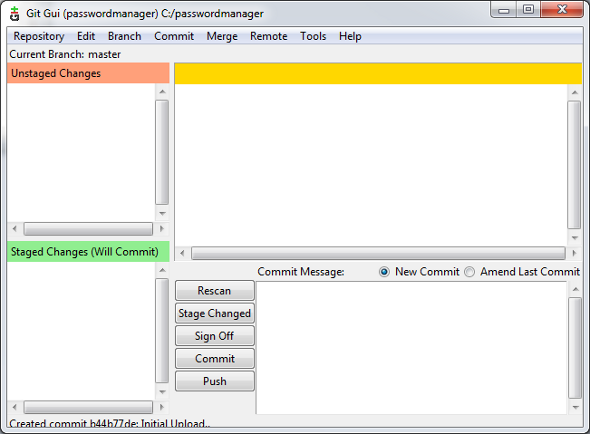
6) Modify a file
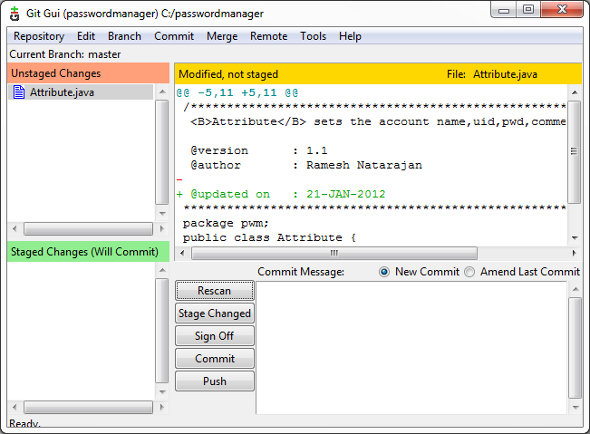
Whenever you modify a file from this local repository (in this example, c:\passwordmanager), you need to go to Git and stage the changes -> commit the change to the repository. For example, I modified the Attribute.java file located under c:\passwordmanager, and clicked on the “Rescan” button from the Git GUI, which will display only the changed file (for example: Attribute.java) in the “Unstaged Changes” section. You can click on this file, to see what lines were actually changed.
If you are happy with this change, click on “Stage Changed”, and then click on “Commit” to get this change committed to the local Git repository.
3. How to Connect to a Remote Git Repository
Most of the times, you’ll install Git GUI on Windows, so that you can download a remote repository located on a Linux server, and download the files to work on your local system.
In this case, you need to use the “Clone Remote Repository” item from the Git GUI main menu.
When you clone, Git pulls all the versions (not just the current version) of every file from the remote server.
Source Location: This is the remote git URL. In most scenarios, you’ll be connecting to a remote Git repository using SSH.
Enter the source location in any one of the following format (Both are exactly the same):
- ssh://username@servername:gitproject
- username@servername:gitproject
In the following example, I’ve given ramesh@thegeekstuff.com:passworddragon, which will connect to thegeekstuff.com server using SSH protocol, and with username ramesh. Once connected, this will try to download the git project named ‘passworddragon’.
Target Directory: This is the directory on the local Windows machine, where the downloaded git project from the remote server should be stored.
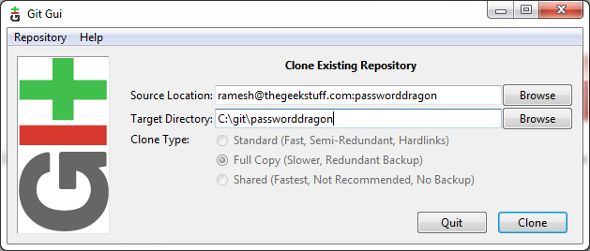
Click on “Clone”, which will request you to accept the SSH key (if you are connecting to the remote git server for the first time), and prompt you to enter the password for the given username. At this stage, this will be downloading all the files from the remote Git repository and clone it as a local repository from where you can make any changes.


 My name is Ramesh Natarajan. I will be posting instruction guides, how-to, troubleshooting tips and tricks on Linux, database, hardware, security and web. My focus is to write articles that will either teach you or help you resolve a problem. Read more about
Comments on this entry are closed.
ahhahaah never thought that you will produce this kind of tutorials. I think you read my mind hahhah.. i scan google yesterday for possible tuts on GIT, never thought i found it on this site.. thanks ramesh..
would u tell me purpose of using GIT GUI?
Nice simple tutorial. One small issue- it doesn’t work quite as straightforward as the above implies. First time you go to commit, you’ll get an error about no user name and email having been set on your repository yet.
A quick explanation that you need to fire up GIT Bash and type the below (inserting your own user name and email) would help:
git config –global user.name “”
git config –global user.email “”
Oddly, nobody seems to explain this clearly anywhere on the internet (that I’ve seen)- it’s like it’s assumed everyone knows you need to use GIT Bash and not try and type this into the Windows Command Prompt (as I did).
Thanks Ramesh and benj
the code needs a double — dash
git config –global user.name “Jane Doe”
git config –global user.email name@youremail.com
Thanks Ramesh…
I am looking for some setup like…
I have linux Git server having remot repos..
I have to create local repo from remote repo and share my local repo to my team members. I dont want them to directly push code to remote repo.
Could you tell me how to do this?
Hello,
I was trying to use git by just downloading the eclipse plugin in two machines.
installing a free ssh server
make a local repository in one machine
configure remotes on the other machines to access that particular machine
We can connect OK with ssh but are getting errors when trying to reach the got repo.
is this possible or do i always have to install a git server of some sort?
Ramesh, Thank you for the instructions. But I am having trouble cloning the remote repository. It is erroring out on target folder when I select any existing folder from my d:drive, like d:\gitlab, d:\ etc..
I installed git gui for windows and git for my linux box.
I made a repo and by using command line i can clone it.
But how to open it with gui ? it never gives me ok when trying to open git://192.168.1.120/myrepo.git
even if that works ok with command line. I dont want to use ssh becaus this is lan repo only.
Can u tell me how to create second account in git (not in git hub) with a different mail and as a different user but in the same laptop and in same git
Hi,
Found this very useful.
Thanks
Current Git Version is 2.11.0, update site please.
Hi,
Am a Subversion administrator where i can create user and define various access rules to each repository/users.
How can i do that in GIT?