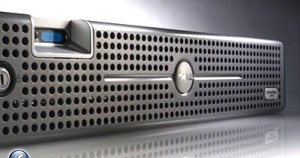
 If you’ve purchased a DELL server only with two disks in a RAID-1 configuration, you might want to add more disks later as your space requirement grows.
This article explains how to create a new Virtual Disk in both RAID 0 a d RAID 1 configuration using PERC H700 Integrated BIOS Configuration Utility, based on the new hard disks you just inserted into the DELL servers.
All the new DELL PowerEdge Servers (for example, Dell PowerEdge R610, Dell PowerEdge R710, etc.) comes with PERC H700 utility to manage the server’s hardware RAID controller.
If you are using older DELL PowerEdge Servers that has a different RAID controller than PERC H700 refer to the following article:
- Create RAID Using PERC 6/i Integrated BIOS Configuration Utility (Used by Dell PowerEdge 1950, Dell PowerEdge 2950, etc.)
- Create RAID Using PERC/CERC BIOS Configuration Utility (Used by Dell PowerEdge 1650, Dell PowerEdge 2650, etc.)
1. Launch PERC H700 Integrated BIOS Configuration Utility
Insert all new disks into the empty slots. If there are already disks on slot 0 and slot 1, start inserting the new disks from slot 2. In this example, the new 4 disks are inserted from slot-2 to slot-5.
In this example, my intention is to create a new RAID-0 with the disks that were inserted in slot 2 and 3, and a new RAID-1 with the disks that were inserted in slot 4 and 5.
After the disks are inserted, reboot the server. When the server is starting up, press Ctrl-R to launch the PowerEdge Expandable RAID Controller BIOS. Press Ctrl-R when it is displaying the following message on the console.

This will launch the H700 Integrated BIOS Configuration Utility. This utility will have the following three TABs on the top.
- VD Mgmt – Virtual Disk Management, which is selected by default
- PD Mgmt – Physical Disk Management
- Ctrl Mgmt – Controller Management
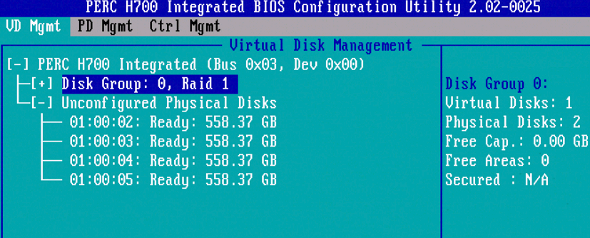
You’ll see the 4 new disks that we added in the “Unconfigured Physical Disks” section under “VD Mgmt” tab as shown below:
2. Launch the Operations Menus
From the Virtual Disk Management, use arrow key and select ‘PERC H700 Integrated (Bus 0x03, Dev 0x00)’. Press F2 to show available operations. This will display a pop-up menu with following choices. Select “Create New VD”.
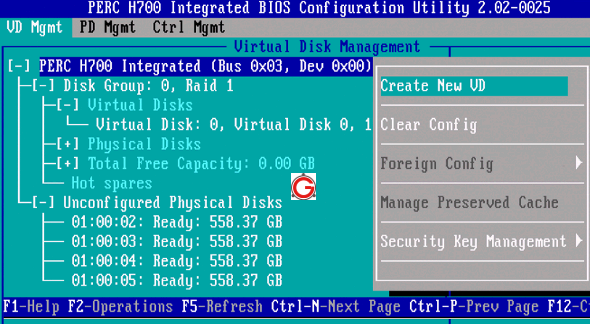
- Create New VD
- Clear Config
- Foreign Config
- Manage Preserved Cache
- Security Key Management
3. Create a Virtual Disk with RAID-0
This will display the following screen:
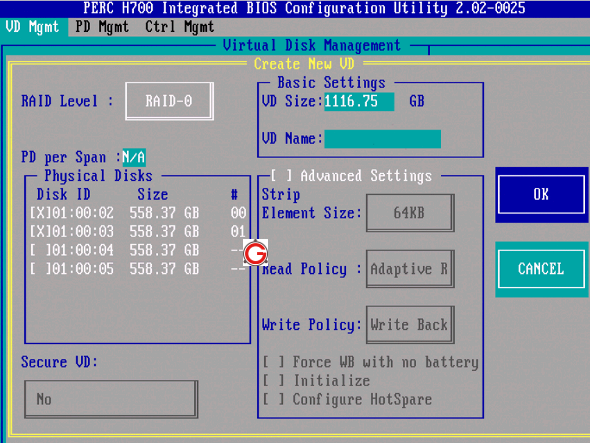
In the above screen, do the following:
Press Enter on the RAID option, which will display the available RAID choices. In this example, I choose RAID-0.
Use Tab key and scroll to the “Physical Disks” section, which will display all the new disks available.
Press space-bar which will select the highlighted disks. In this example, I selected the 1st two disks. The “X” in front of the disk indicates that it is selected to be included in this particular virtual disk creation.
In the “01:00:02” and “01:00:03” that is displayed in the front of the disks, the last two digits represent the slot number. This indicates that I’ve selected the disks that were inserted in the slot number 2 and 3 for this virtual disk creation.
Based on the number of disks selected, and the RAID type selected, the “VD Size” will show you how much usable disk space you’ll be getting out of this virtual disk. In this example, I get roughly 1 TB, as I’ve selected two 600GB disks on RAID-0 configuration.
Keep all the following options to the default values, and press enter when ‘OK’ is selected.
- Element Size: 64KB
- Read Policy: Adaptive Read
- Write Policy: Write Back
- Force WB with no battery unchecked
- Initialize unchecked
- Configure HotSpare unchecked
You might get a pop-up with the following message. Just click ‘OK’ on it:
“It is recommended that all newly created logical drives be initialized unless you are attempting to recreate a previous configuration and recover data as initialization is a destructive process.”
4. Review the new RAID-0 Disk Group
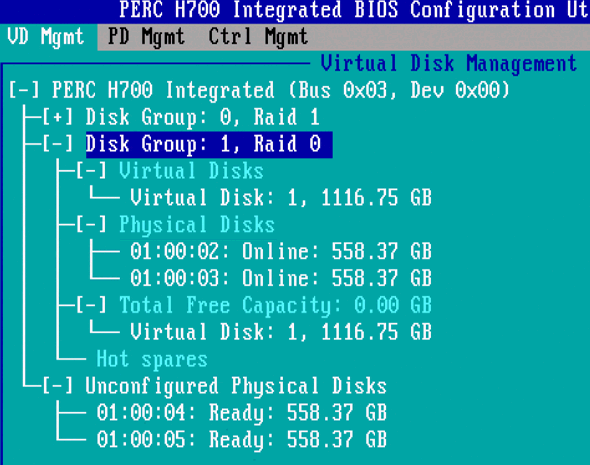
This will create the “Disk Group 1” (with RAID-0) as shown below. This displays the following information:
- Virtual Disks: This indicates that there is only one virutal disk in this disk group, with size of roughly 1 TB.
- Physical Disks: This indicates all the physical disks that are part of this virtual disk group.
- Total Free Capacity: This indicates the free capacity available in the virutal disks
- Hot Spare: This is empty in this example.
Since we’ve used 2 disks out of the 4 new disks that we inserted, we only see 2 disks under the “Unconfigured Physical Disks” section.
5. Create a Virtual Disk with RAID-1
Use the arrow key and select “PERC H700 Integrated (Bus 0x03, Dev 0x00)”, Press F2, select “Create New VD”.
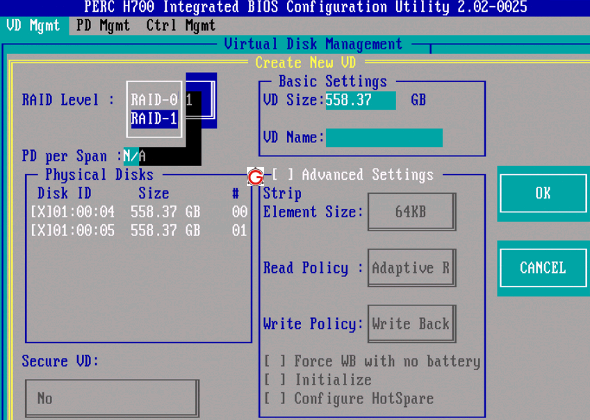
This time, use RAID-1 and select the remaining two disks. Since we used RAID-1, this will give usable disk space of only one disk (the other disk will be used for mirroring the data). Leave all the other values to default selection.
6. Review the new RAID-1 Disk Group
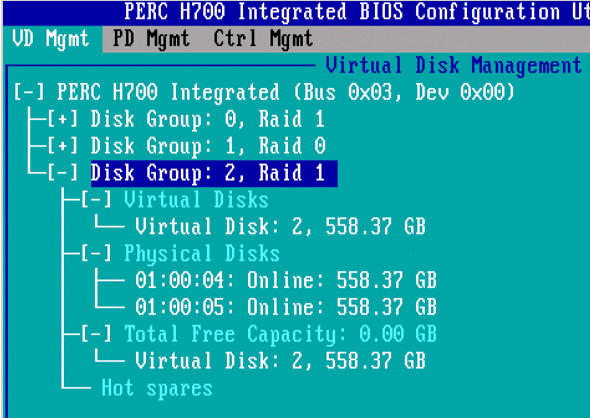
Review the newly created “Disk Group 2” (with RAID-1) as shown below. As you see there is no more “Unconfigured Physical Disks” section, as we’ve used all the unused disks.
7. Physical Disk Management (PD Mgmt)
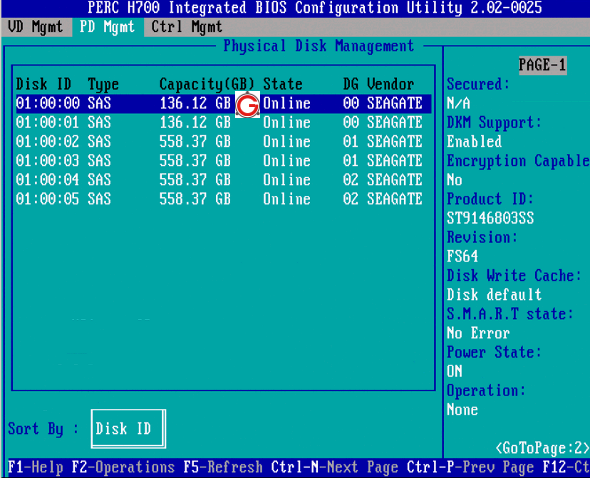
To manage the physical disks themselves, Press Ctrl-N, which will take you to the “PD Mgmt” tab and display all the disks that are available on the server.
To perform any operations on these disks, use arrow keys and select a disk, and press “F2”. For most part, you don’t have to do anything here. Just be aware of what operations can be done on the disks, just in case, if you need it for any future use.
8. Controller Management (Ctrl Mgmt)
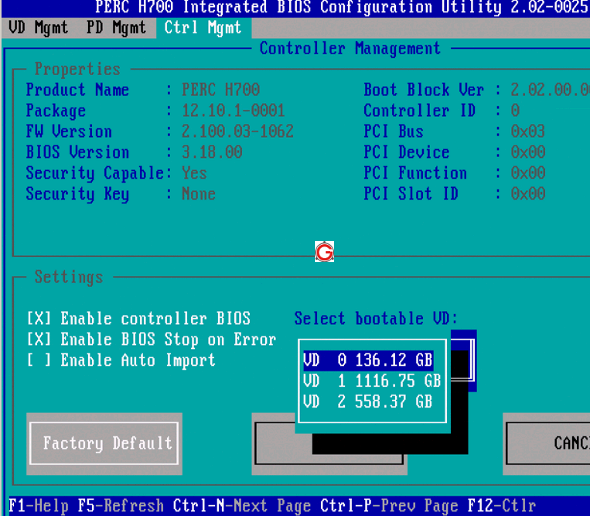
To view the hardware RAID controller information, press Ctrl-N, which will take you to the “Ctrl Mgmt” tab as shown below. You can also change your bootable virtual disk from the default 0 to something else. For most part, you don’t have to do anything here. Just be aware of what operations can be done on the controller.


 My name is Ramesh Natarajan. I will be posting instruction guides, how-to, troubleshooting tips and tricks on Linux, database, hardware, security and web. My focus is to write articles that will either teach you or help you resolve a problem. Read more about
Comments on this entry are closed.
Its awesome …really useful ….Thanks for the post
Hi Ramesh,
Thanks for the post , For Some Sun Raid controller we have Storman [arrconf] for confiruing Hardware raid with out rebooting servers, is there any such for PERC H700
Thank you for the tutorial. didn’t know about this – always used the boot cd – and love the raid bios now. your tutorial was great. thanks
how can we test that system has been RAID5 configured ?
Excellent post…worked perfectly.
Thanks
Thanks for this post man !
Hi Ramesh
I have a Dell R710 server with two hard drives of 300 GB c / u.
This is configured with RAID 1.
But, when you install Windows Server 2008 R2, the hard drive is not recognized. (indicates that the controller-controller-failure).
Download a driver the following address (but the problem persists): http://www.dell.com/support/drivers/us/en/04/Product/poweredge-r710
I personally find it a driver problem, if not in RAID configuration, I’m skipping something. Or am I not considering the correct driver.
thanks
Already solved
And it had to start with the Systems Build and Update Utility CD and install from there.
That instance is the “initialize Hard Drives” and when you install Windows Server 2008 OS recognizes it.
Thanks anyway
Excuse my ignorace, but will this create RAID 10 or add (2) seperate RAID’s, (0 & 1) to the already existing RAID 1?
Ramesh –
Thanks for the tutorial! I have an issue though. I am using 4 drives of 500gb each, but I need 10 separate volumes to be created for different versions of windows. Can I split the space on my four hard drives into 10 VD’s in a RAID 0 configuration using the controller software? Thanks in advance!
What is Foreign Configuration and when to use it?
Perc h700 six 6 PD available RAID5 with HS. I just removed HS how can i make the available disk online?
Hi,
Please also, upload article with screen capture for creating RAID in HP BIOS & GUI version. Also, for IBM servers.
If possible also upload screen capture of Dell OSMA, iDRAC, HP iLO, HP Management tools, IBM Lenovo RMM and its Management tools.
helpful, thanks!
Thanks for writing this!! Great article.
I tried to create virtual disk on my Dell PowerEdge R610 but pressing ctrl + R is not taking me to the disk management. Is there any other way around it?
how to verify hardware raid configuration using cmd??