When you are working with EMC support, or any other EMC vendors, they’ll ask for SP collect information from your EMC CLARiiON storage array. The spcollect zip file will provide them all the information they need to know about your storage array.
This tutorial explains how to execute SP collect on EMC storage array from both Navisphere and Command Line using navicli.
I. SPCollect From Navisphere
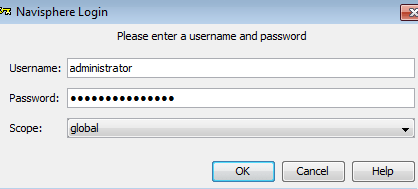
1. Login to Navisphere
You can login to navisphere UI either from SP-A or SP-B ip-address. Make sure to enter the appropriate username and password in this screen to login.

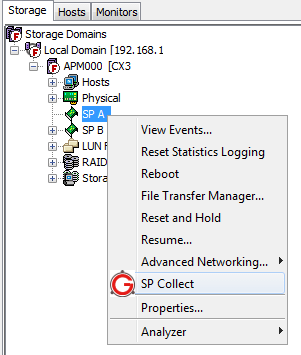
2. SP Collect Menu for SP-A
From the Storage Tab, click on “+” to expand “Local Domain”, then click on “+” in front of the serial number of the array to expand it further.
Now, select “SP A” (Storage Processor A) and right mouse click, which will display a pop-up menu. In the pop-up menu click on “SP Collect”

3. Execute SP Collect for SP-A
This will show a confirmation dialogue with question “Do you want to run SP Collect script now?”. Click on “YES” to continue here.
Depending on the size of your array, and other configuration information on your array, this might take some time to finish. But in most cases, it should finish within a minute.
Once it is done, it will display a success message. Click “OK” on this screen.

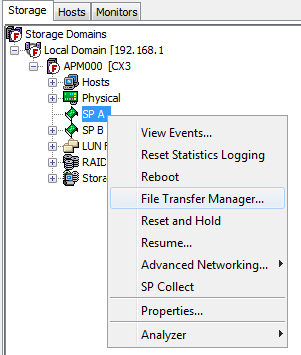
5. Go to File Transfer Manager for SP-A
Go back to the tree, and select the “SP A”, and right mouse click, which will display a pop-up menu. In the pop-up menu click on “File Transfer Manager”.

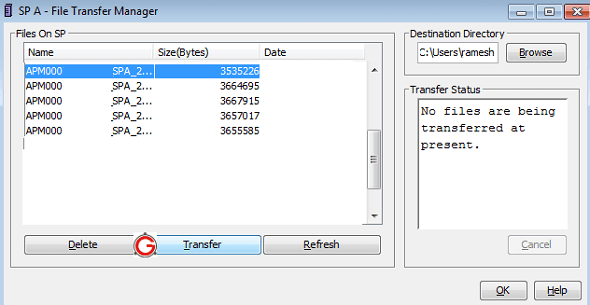
6. Get SP Collect Zip File for SP-A
This will display the following File Transfer Manager screen for storage processor A. The name of the SP Collect file will be in the following format:
{serial number of the array}_SPA_{date and time}_data.zip
For example:
APM000444555777_SPA_2013-10-05_23-43-27_1cc1d0_data.zip
If you’ve run SP Collect multiple times before, you’ll see multiple zip files. Make sure you select the correct file from his list. To make it easier, you can also click on the “Date” column, which will sort by date.
If you like to change the location on the local machine where you need the files to be transferred, click on “Browse” next to “Destination Directory” on the top.
Once you’ve selected the correct SP collect zip file, and a destination directory, click on “Transfer” button, which will transfer the zip file from the array to your local machine.

Before transferring it will give the following warning message. Click on “Yes” to continue.
Once the transfer begins, you can see the status in the “Transfer Status” section.
7. Repeat the Above for SP-B
Anytime you execute SP Collect, you should do it for both the storage processors (i.e SP A and SP B ).
So, repeat all of the above steps for “SP B” (Storage processor B). But, this time, choose “SP B” in the navigation tree. “SP B” will be right below “SP A” in the navigation tree.
After you are done, you should now have two zip files.
II. SPCollect from Command Line
You can also execute SPColect from the command line using navicli or naviseccli command.
The following example assumes that the ip-address of “SP A” (Storage processor A) is 192.168.1.10
1. Execute the SPCollect on SP-A
Use the naviseccli command and execute it from the command line as shown below using the SPA ip-address. This command assumes that you’ve already execute naviseccli command to login.
# naviseccli -h 192.168.1.10 spcollect
If you’ve not logged in yet, use the following command to pass the username and pasword accordingly.
# naviseccli -user Administrator -password MySecretPwd -scope 0 -h 192.168.1.10 spcollect
2.View the SPCollect Zip files on SP-A
Execute the following command which will display all the files in the SPA.
# naviseccli -h 192.168.1.10 managefiles -list
3. Retrieve the SPCollect Zip file from SP-A
Execute the following command, which will transfer the specified SP Collect ZIP file from the SPA to the location you’ve specified on your local machine.
# naviseccli -h 192.168.1.10 managefiles -retrieve -path /home/ramesh/ -file APM000444555777_SPA_2013-10-05_23-43-27_1cc1d0_data.zip
Finally, execute all of the above naviseccli command again. But, this time specify the ip-address of the “SP B” storage processor B.


 My name is Ramesh Natarajan. I will be posting instruction guides, how-to, troubleshooting tips and tricks on Linux, database, hardware, security and web. My focus is to write articles that will either teach you or help you resolve a problem. Read more about
Comments on this entry are closed.
If I am not wrong then in order to get the screen for reboot of SP form the Navisphere GUI, then we need to go to Engineering mode
1. Login to Navisphere normally as we do
2. Once logged in from you keyboard type:- Ctrl+Shft+F12
3. It will ask for password, enter password as “messner”
4. Then you will go into engineering mode
5. Once you are in engineering mode then you will get the option of reboot of SP
Dear EMC Team;
thanks for best sharing knowledge from above but totally I have failed to install Java which can assist me to access GUI(Graphical User interface) of EMC.
our EMC IP is as follows:10.7.7.139/140
10.0.5.37/38
I wish to know how I can install Java so that I can open GUI of Our EMC disk on Our Servers.
warm thanks
Robert.