If you are thrown into a situation where someone already installed a Windows Hyper-V server for virtualization, it is helpful to understand how to perform certain basic sysadmin operations like creating a new VM.
Once you’ve installed the Hyper-V server free stand-alone version, you can create a new VM using one of the following methods:
- Using powershell commands on Hyper-v server.
- From Hyper-V Manager (Hyper-v role enabled Windows servers )
Since we love command line, in this tutorial, we’ll discus how to create a new VM using powershell commands on Hyper-V server
1. Lanuch Powershell Command Prompt
Type powershell from the Windows DOS prompt, which will take you to the powershell command line environment as shown below.

2. Use New-VM Command to create VM
The following is the syntax to create a new VM on powershell using New-VM command.
New-VM -Name -Path -MemorystartupBytes
Create a new VM as shown below:
New-VM -Name Testmachine -path C:\vm-machine --MemoryStartupBytes 512MB
- New-VM = New Virtual Machine (Command)
- Name = Virtual Machine(Testmachine -is out virtual machine name),
- Path = Folder Path to store Virtual Machine files,(C:\VM-machine is out VM file location path)
- MemorystartupBytes = RAM Size to the Virtual Machine,(512MB is out VM machine RAM size)

Note: After creating the Virtual machine, it will create folder with virtual machine Name and stores all machine files in that folder.
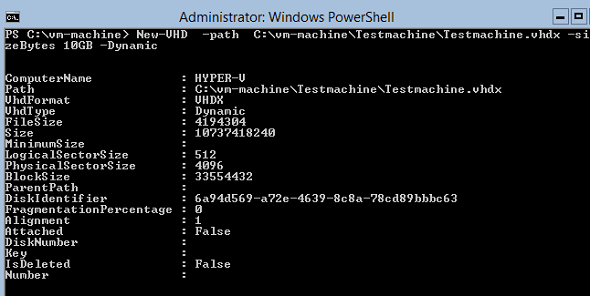
3. Use New-VHD Command to create Hard Disk for VM
The following is the syntax to create a new hard disk for our virtual machine using New-VHD command.
New-VHD -Path c:\vm-Machine\Testmahcine\Testmachine.vhdx -SizeBytes 10GB -Dynamic
- New-VHD = New Virtual Hard disk
- Path = folder path to store Virtual hard disk, (As a best practice create the Virtual hard disk inside the Virtual machine folder)
- SizeBytes = Hard disk memory size
- Dynamic = It will increase the hard disk size from the size 0Bytes to maximum size (In our case 10GB is the Maximum size )

4. Attach Virtual Hard Disk to Virtual Machine
The following is the syntax to attach the above virtual hard disk to the new virtual machine using Add-VMHardDiskDrive command.
Add-VMHardDiskDrive -VMName -Path
Attach virtual hard disk to VM as shown below:
Add-VMHardDiskDrive -VMName TestMachine -path "C:\vm-machine\Testmachine\Testmachine.vhdx"
- Add-VMHardDiskDrive = Adding Hard disk to virtual Machine
- VMName = Virtual machine name
- Path = Virtual Hard disk file path

5. Map ISO Image to Virtual Machine CD/DVD ROM
Enter the following command in powershell to Map ISO image to the Virtual Machine CD/DVD ROM:
Set-VMDvdDrive -VMName -ControllerNumber 1 -Path
- Set-VMDvdDrive = Set the VM DVD drive settings
- VMName = Virtual Machine Name
- ControllerNumber = Drive controller IDS
- By default Hard disk will in Controller 0 and DVD will be in Controller 1

6. Start the new VM
Start the newly created virtual machine using Start-VM command as shown below.
Start-VM -Name
If you want to install the OS from the Powershell means the Mapping ISO should have auto installation file also. As a best practice, install the OS from the Hyper-V Manager.
If you have to stop the virtual machine, use the Stop-VM command as shown below.
Stop-VM -Name
7. Check New Virtual Machine Status
Use the Get-VM command to check the status of the new virtual machine. As this indicates this new VM is operating normally without any issues.
Get-VM


 My name is Ramesh Natarajan. I will be posting instruction guides, how-to, troubleshooting tips and tricks on Linux, database, hardware, security and web. My focus is to write articles that will either teach you or help you resolve a problem. Read more about