Audacity is an open source software for manipulating audio. The following are few important features of audacity:
- Record live audio
- Playback recorded audio/sound files
- Edit sound files by cut, copy & paste.
- Convert audio from one format to another
Apart from Linux you can also install Audacity on Windows and Mac OS X.
This article explains few essentials features of audacity with screenshots.
1. Install Audacity Tool
On Linux, use appropriate package management tool to install Audacity. For example, on Ubuntu, use apt-get or aptitude tool as shown below.
# apt-get install audacity
For windows, after downloading executable from here, click on the exe to install it,
2. Record Audio from Microphone and Playback
In Audacity, toolbar contains buttons like Pause, Playback, Stop, Skip to begin, Skip to End, Record.
As you can imagine, the basics are very straight forward; to start the recording, press the record button, which will activate your system’s microphone and start recording. While recording, you can also pause in-between, and finally press the stop button to stop recording. When it is recording, it will also display the audio waves based on the input voice. We can manipulate these audio waves to edit the audio files.
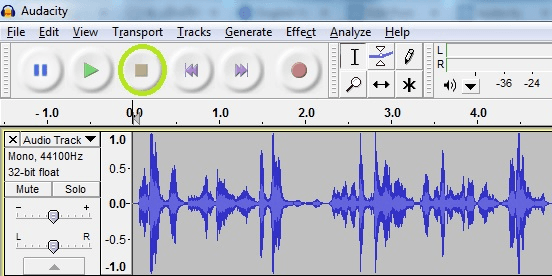
To change between Mono and Stereo channels, go to Edit -> Preferences -> Devices and then change Channels value.
3. Manipulate Audio Tracks by CUT, COPY and PASTE
In your audio tracks, the unwanted portion of voices can be deleted by selecting it with mouse and pressing delete button in keyboard.
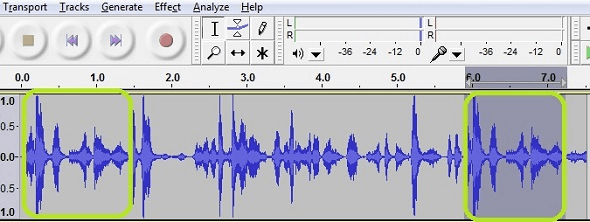
If there is a need to repeat a specific portion of voice tracks in some other places on this audio track, you can use simple copy/paste for this purpose.
Just like you can imagine, use your mouse to select a portion of the track that needs to be copied and press Ctrl + C. Paste this by placing cursor at a specific location on the track and press Ctrl + V.
4. Adjust Audio Peaks
The audio peaks in voice tracks can be reduced by adjusting the amplification in places where its required.
Select the portion of audio peak tracks, and click on Effect -> Amplification. In the amplification window enter negative value to reduce amplification.
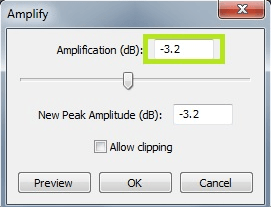
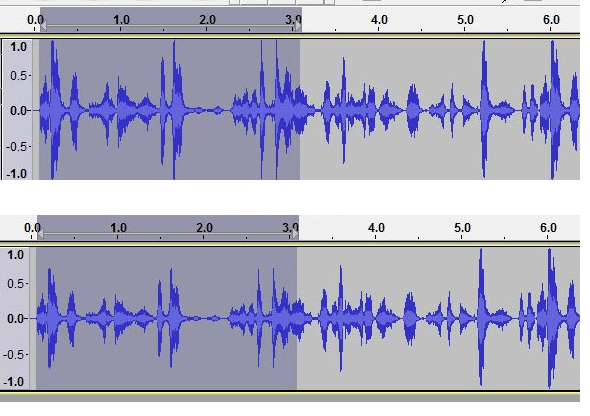
Positive or negative amplification can be applied on selected tracks. If peaks are to be reduced, then apply negative amplification, at first try with value 2 and keep increase it until the voice gets proper.
The following shows the effect on the audio wave before and after changing the amplification settings.
Please remember that you can freely play around on audio tracks as always the undo option is available by pressing Ctrl+Z keys.
5. Remove Noise from Audio Tracks
During the playback of an audio file, if you find background noise, it can be removed using Noise Removal feature.
Select the portion in the track where you like to remove the noise. In this example, we’ll selecting from the beginning of the track.
Click menu Effect -> Noise removal,
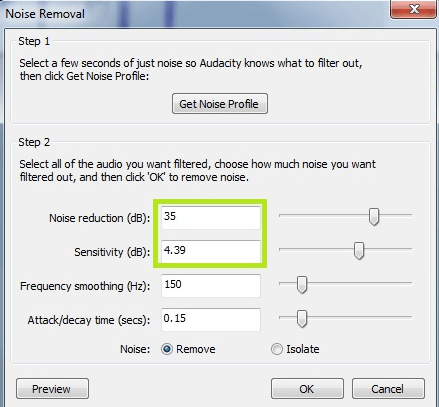
As seen above, open Noise Removal after selecting the noisy portion. Those noises can be reduced/removed by adjusting values (increase Noise reduction and Sensitivity) in “Noise removal” feature such noise reduction and sensitivity values.
The following audio wave shows how it looks like after removing the noise.
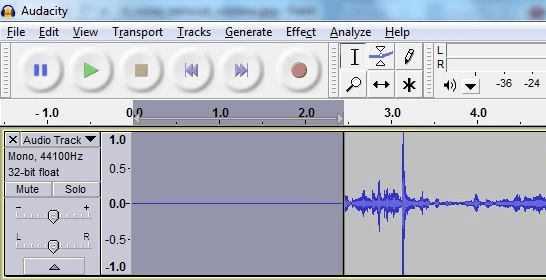
Play around with the value and adjust it until you feel that the noise is removed completely.
6. Record Audio Files as MP3 files
MP3 format is a compressed audio format. Audacity supports exporting audio files as MP3.
The pre-requisite is that the plugin “Lame” needs to be installed, and then the installed path has to be located by audacity by following below steps.
For Windows, download the LAME plugin from here, and install it.
From Audacity, click on Edit -> Preferences -> Libraries, click on button “Locate” nearby MP3 library text. Just cross check that the path shown here is the installed path of LAME and click ok.
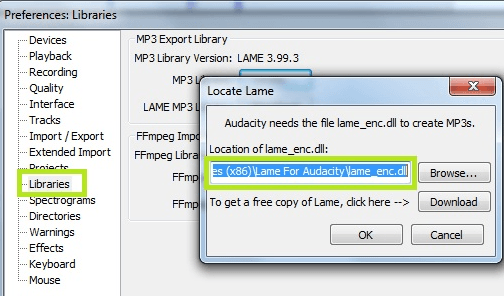
After this, to save recorded audio in MP3 format, click File -> Export, which will give the option to save the file in MP3 format.


 My name is Ramesh Natarajan. I will be posting instruction guides, how-to, troubleshooting tips and tricks on Linux, database, hardware, security and web. My focus is to write articles that will either teach you or help you resolve a problem. Read more about
Comments on this entry are closed.
Thanks.
I hope we can profile more open source replacements like this and publicise it.
Hi,
Thanks, very useful article
Another good/simplier alternative is ‘audio-recorder’. It’s a gnome application that works well in the xfce DE.
Nice lessons learned… thanks.
Thanks a lot for a very useful article. God bless you!
Very simple, useful and easy to understand. I was facing difficulty to save my recoded audio karoake song. I will try to practise it. Thank you very much.